Showing posts with label TIPS TRICKS. Show all posts

Friday, September 3, 2010

Enjoy 3D Sound From Your PC With AstoundSound Expander

Sound enhancers are nothing new. Windows Media Player has SRS TruBass and WOW, which enhance bass and expand the sound field, built right in. iTunes and many MP3 players (with the noticeable exception of the iPod series) also have enhancers. However,AstoundSound Expander ($40, 30-day free trial) is rather unique in the consumer field in its ability to create a 3D sound field with virtually no fuss.


There's not a whole lot to using AstoundSound Expander. You install it and it then sits in the system tray doing its background processing on all audio passing through any particular output. If you have multiple audio output devices, you may select which one the effect works on. There are three buttons that will optimize the effect for movies, music, and games, as well as a slider that varies the intensity of the effect, and a pre-amp slider that will add gain to the input signal. There's also a recycle button to re-enable the effect should it get locked out of the audio chain, which happened once to me with the VLC player when I left AstoundSound Expander off for a while. The effect also crashed once and required a reboot of the system for sound to return.


I was skeptical before I installed AstoundSound Expander. However, it really does create an illusion of depth that I'd not heard before outside of the $30 SRS HD Audio Lab and high-end audio workstation plugins (which will also available from GenAudio soon). SRS WOW and the iTunes sound enhancer tend to broaden the sound field laterally, and so does AstoundSound Expander, but with ASE, certain sounds appear nearer to you than others. As with all sound field effects, the results vary by the material, and it helps to be dead center between the speakers (it won't work with mono systems). I enjoyed ASE more with movies than with music, though it's effective with both depending on the intensity. My only wish is that it would allow you to pump up the bass a bit.


AstoundSound Expander performs as advertised and works on the output of any media player though you may suffer the occasional crash. It's simpler to use than SRS HD Audio Lab, if not as tweakable, although it lacks the latter's bass enhancement. Whether AstoundSound Expander is a big enough thrill or improvement on built-in enhancers to plop down a fair amount of cash for it is up to you, but it's most definitely worth checking out the free trial.

Thursday, September 2, 2010

How to Record Streaming Audio

Want to revisit your favorite Internet-radio memories? Here’s how to record streaming audio on your PC.

Want to capture a song from an Internet radio station, grab a line from the latest viral YouTube clip, or make a mashup of Windows system sounds? We're not here to judge--we're here to show you how. Follow these easy steps to record any audio that plays through your PC.

1. Find a Male-to-Male Audio Cable

Before you start recording anything, you need to find amale-to-male 1/8-inch audio cable. If you don't have one, you can buy one for less than a buck from MonoPrice.com. If you have external speakers for your PC, the cable that connects the speakers to your system's headphone jack may work.

2. Download Audacity and LAME

Next, download and install Audacity, a free open-source audio editor. While you're waiting for that to download, grabLAME for Audacity if you don't have it already; you'll need it if you want to save your files as MP3s. (Having problems installing LAME? Read the installation instructions.)

3. Set Your Input and Output Devices in Audacity

Open Audacity, select the Edit menu, and choose Preferences. Under the Devices tab, choose your microphone jack (it's called 'Microsoft Sound Mapper - Input' on my PC) for the recording device, as well as whichever audio source you want to record from as the playback device. If you're on a PC with a built-in Webcam (usually an all-in-one computeror a laptop), make sure not to select your Webcam's mic as the recording device, because it won't sound very good.
Plug one end of the male-to-male 1/8-inch audio cable into the microphone jack, and the other end into the headphone jack. This way, your PC can record directly from the audio-out source without as much background noise or distortion. You can do without the cable, but the results won't turn out as well.

4. Record

Click the Record button in Audacity and start playing the source. If the reading in Audacity looks like a full solid bar, the volume levels are too high, and the recording will sound heavily distorted. While recording audio from YouTube videos, I found that I got the best results when I set the system volume, the YouTube volume, and the Audacity levels all to about 25 percent or so. Experiment with the volume settings before recording the version you want to keep.


Once you've finished recording, go to the File menu, choose Export, and select MP3 from the 'Save as type' drop-down menu. If Audacity asks you to locate lame_enc.dll, it should be in the LAME for Audacity package you downloaded and unzipped.


That's all! Feel free to share your audio-recording tips in the comments.


Friday, August 13, 2010

Use Android Mate (Free) to remove bloatware from your Android phone

A growing trend with Android smartphones is the inclusion of bloatware (software/apps that come preinstalled on the phones). While bloatware is easily uninstallable when included onto Windows PCs, uninstalling bloatware from your Android phone is a bit more tricky.
Before a user can remove any bloatware from his/her Android phone, he/she first needs to root it. There is no way to remove bloatware without root because bloatware is hidden in a system folder (/system/app) which users cannot access without "superuser" permissions; rooting gives users "superuser" permissions. With many popular Android devices having a one-click root/unroot program available, rooting isn't very hard anymore. Just search Google or visit XDA-Developers to learn how to root your device.
After the device has been rooted, there are multiple different ways to remove bloatware. Users can remove bloatware via terminal, but unless you are comfortable with command line, terminal is not for you. Instead, there are programs like Root Manager and Root Explorer which allow users to access the /system/app folder and easily uninstall apps without ever having to use command line. However, both Root Manager and Root Explorer are paid apps costing users $2-4 each (not a large sum, mind you, considering they help you remove all the crap on your phone). Android Mate (Free) is another such app that allows users to access /system/apps... but Android Mate (Free) is, well, free.
(Be sure to create a backup of your phone before trying to remove any bloatware, so if anything does wrong you can restore your backup!)
To remove bloatware with Android Mate, run it after installing it. Before you can do anything with it, you will need to give it superuser access; hit "Allow":
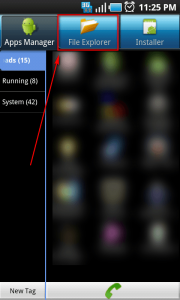
After you give it superuser access, navigate to "File Explorer" and type in/system/app:


At the /system/app folder, select the APK and ODEX files of the apps that you want to remove, and hit "Delete":
Be warned that even with superuser permissions you should not just remove any and all apps you want; some apps are required for your phone to function normally, so I highly recommend you do a little bit of research to see what apps can be removed safely and what cannot. Typically third party apps, apps that are not from Google, your phone manufacturer, or your service provider (like apps from Amazon) can be removed safely.
Take note that sometimes Android Mate is quirky. It took me three attempts to delete apps from the /system/app folder; on the first two attempts the apps simply were not deleted. On the third attempt - and all attempts afterward - the apps got deleted just fine. So, if you find Android Mate is not properly deleting apps, try it again until it works.
Last but not least, Android Mate provides a lot more features than just bloatware removal. It is a launcher, an installer, an uninstaller - the developer describes it as "Android Mate = App Organizer + SU File manager + Task manager + APK Installer". (You may be prompted by Android asking if you want to use Android Mate as your default launcher - you can always say no and use the launcher you had before.) Unless you want to use the rest of Android Mate's features, you may want to consider uninstalling the app after you have removed all the bloatware off your phone.
In the end, though, Android Mate provides a handy, free way to remove bloatware off your Android phone. To grab Android Mate, search the Android Marketplace for "Android Mate (Free)", use your bar code scanner on the QR code (found below), 

Saturday, July 24, 2010

VLC Media Player Tips & Tricks

VLC 1.1.1 has released to widespread acclaim. The media player of choice for many, has packed in a horde of new features and marked changes in the design and interface. There are only two issues we have with the new design, which we will put out of the way first. The playback bar has jazzed up buttons, which won’t appeal to those who went for the minimalist charm of VLC. They have also inverted the direction in which the scroll works with the media, you scroll down to go backward, and scroll up to go forward which is counterintuitive to everyone and irritating to the long term users. Now for the good stuff.


Take Snapshots Of The Video

Go to Tools > Preferences > Video. Under video snapshots, enter the directory, a prefix, check ‘sequential numbering’ and choose a format. The default is .png.

To take the snapshot while the video is playing, go to Video > Snapshot.


Alternatively, you can take a snapshot using the keyboard with the hotkey [Shift] + [S].


To use a button to take a snapshot, go to Tools > Advanced Controls. The snapshot button appears on the playback bar.


Adjust The Colour Of The Video


In the playback bar, click on the icon that looks like the equaliser for lesser media players. This is right next to the playback button.


Then select the ‘video effects’ tab. The ‘basic’ tab will be selected by default. Check the ‘image adjust’ checkbox. From here, you can adjust the hue, saturation, contrast, brightness and gamma of the image. There is also a ‘brightness threshold’ slider.


The changed take place in real time, an this can be used to enhance dark videos.


Stream Video Across A Network


This can be used to broadcast a video over the Net, or to stream videos to everyone’s PC in the office at once, or to everyone’s laptops in a conference room.


Click on advanced open file, select ‘show more options’.


On the bottom right corner, next to the play and cancel buttons will be a small additional options button. Click on this, and select stream. A stream output dialogue will pop up.


You can select the encapsulation, the video and audio codecs and the bitrate. Remember that not all formats can be converted to all other formats, this is a limitation of the format and not of the player. Under outputs, select a protocol. Selecting multiple protocols will stream the video output in all the protocols.


To open a stream, go to ‘Advanced open file’, select the ‘Network’ tab and select the relevant protocol and address.


Overlay A Logo On The Video


Go to Tools > Preferences. Select ‘All’ under ‘Show Settings”


Go to Video > Subtitles / OSD > Overlays.


Click on ‘Logo Subfilter’ under Sub Picture Filter Module. Enter the path and filename in the bar below.


To do this via command line, go to Tools > Add Interface > Command Line.


Add A Ticker To The Video


Go to Tools > Preferences, select ‘All’ under ‘Show Settings’


Go to Video > Subtitles/OSD > Marquee. Enter the text in the marquee, and the text will scroll across the screen while the video is playing.


You can also tweak the settings to get an RSS feed to scroll across the video. Copy the feed url, then go to Tools > Preferences, select ‘all’ under ‘show settings;


Go to Video > Subtitles/OSD tick on “RSS and Atom feed display’ and enter the URL in the bar.


There is an option to display or not display images in the feeds.


Add Effects To The Video


We are not sure why this feature is provided, but it is fun and users may discover innovative uses for them.


Click on the effects button. Go to Video Effects > Image Modification.


The gradient effect gives a cartoonish feel to the video. The motion blur has a factor slider. These are the two main effects.


The other effects include waves, motion detect, noise, water and psychedelic. You can apply a selection of these effects at once to the video. The changes take place in real time.


To Resume Playback From A Specific Time


If you were interrupted while watching a video or a movie, and want to resume from the exact moment you left off, there are two ways to do it.


While playing the movie, go to Playback > Go to specific time, and enter the time in dialogue that pops up.


The other way to do this is to go to Media > Advanced open file, check ‘Show more options’ and enter the Start Time.


Use VLC As A Transcoder


Open a file, then go to Media > Convert/Save. In the file tab, click on the Convert/Save button.


Select the ‘File’ checkbox under ‘Outputs’. Enter a file name. Make sure that draw raw input is unchecked.


Then select an encapsulation, that is basically the format under ‘profile’.


Select a video codec and audio codec under the ‘Video codec’ and ‘Audio codec’ tabs.


You can save files in a format to be played on a portable media device.


Click on Save.


Change The Jump Settings


There are hotkeys to jump backwards and forwards through the file (refer to the list of hotkeys). The default values for the ‘Very short’, ‘Short’, ‘Medium’ and ‘Long’ jumps can be changed as per individual preferences.


Go to Tools > Preferences under ‘Show settings’ select ‘All’. Go to Interface > Hotkey Settings and under ‘Jump sizes’ edit the values as per your preferences. You can also use this window to change the default hotkeys, and add hotkeys to functions that have no default hotkeys.


Using The Loop Function


VLC can loop a part of a song or a video over and over again. To use this feature, go to Tools > Advanced controls.


The loop button should appear on the playback bar. Open the file you want to play, click the button when you come to the part on the media you want to start the loop at. Click on the button again at the part of the file you want the loop to end. VLC will now start playing that portion of a file in an endless loop till you click on the loop button again to stop the loop.


Play Image Files In VLC


VLC has the capability to play image files without having to mount the image files on a virtual drive first. Although many formats are supported, many are not. Open an image file directly for the video to start playing.


Listen to podcasts.


Go to Playlist > Additional Sources > Configure Podcasts. Add the podcast url, or add multiple urls.


Go to Playlist > Additional sources > Podcasts.


Go to Playlist > Show playlist. The list of podcasts you added should appear in the playlist window now. Double-click on one to start playing.


Listen To Online Radio


To listen to online radio, go to Playlist > Shoutcast Radio Listings.


Then go to Playlist > Show Playlist. The Shoutcast radio option should have appeared below the ‘Playlist’ and ‘Media Library’ options. A long list of genres and radio stations will appear. Select one that you want to listen to you. Some of the stations listed don’t work, and some might make the player crash. Some stations are listed under multiple genres.


Prevent Screensaver Interruption


This is a highly useful feature that prevents a screensaver from interrupting the movie you are watching.


Go to Tools > Preferences. In the dialogue that pop ups, look at the bottom left corner, and select the ‘All’ radio button under ‘Show settings’. Click on ‘Video’ preferences, and under ‘General Video Settings’ look for the ‘Disable Screensaver’ checkbox.


Skins


VLC supports skins. VLC skins can be downloaded from their site, but VLC also supports winamp 2 and xmps skins. Go to Tools > Preferences. In ‘Interface’, select the ‘Skins’ radio button and load the skin file from here.